600cc X4-X7 Setup Guide
Wishbone Rear Suspension • Revised January 2026


- Wingless Setup
- Outlaw Winged Setup (14’ sq)
- A-Class / U6SA Winged Setup
- Important Notes
- Bump Rubber Notes
- Looser / Tighter Adjustments
- Winged Setup Changes
- X7 Shackle & Bearing Carrier
- X7 Short Wheelbase
- X7 Front Shock Sliders
- Stopping the Hop
- Other Setup Notes
- Jacob’s Ladder
- RR Wishbone Height
- Corner Phases & Adjustment
| Left Front | Right Front | Left Rear | Right Rear | |
|---|---|---|---|---|
| Torsion Bar Size (+ Turns) | .712 (+1/4) | .700 (+1) | .725 (+1) | .700 (+1) |
| Coil Size (+ Turns) | 140 (+1) | 125 (+3) | ||
| Block Size | 1-1/4" | 1-1/4" | 1-1/4" | 1-1/4" |
| FK Shock Coil Over | 389-321, 389-2002 | 389-320 | 389-327, 389-331 | 389-210, 389-210-NC |
| FK Shock 4-Bar | 389-318 | 389-319 | ||
| Rebound Adj. (Clicks) | Full Soft +2 | Full Soft +1 | Full Stiff -3 or -4 | Full Stiff -5 |
| Compression Adj. (Clicks) | Full Soft +6 | Full Stiff -7 | Full Stiff -8 | |
| Center Line of Tire Offset | 40-1/2" Front Axle | 1" to the Right | 5/8" from Chain Block | 16" to 17-1/2" |
| Tire Pressure | 9 psi | 9 psi | 4-1/2 – 8 psi | 5-1/2 – 10 psi |
| Tires | 57x6.0 | 57x6.0 | 62, 63, 64 x10 | 69Wx10 |
| Wheels | 10x7 (5" outer) | 10x7 (5" outer) | 10x10 (6" outer) | 10x13 up to 10x17 |
| Stagger | 5-1/2" (range: 5" to 8-1/2") | |||
| Wheelbase | Long | |||
| Jacob’s Ladder | 3 or 5 Hole in Paddle | |||
| Front Panhard | 3-1/4" | |||
| Right Wishbone Frame Hole | Middle or Bottom | |||
- Use 13" Jacob’s Ladder, 5-3/8" straps top, 5" straps bottom, frame tab hole furthest left top & bottom.
- Use only389-450 Left Rear Bump Rubber, 0" to 3/4" gap.
- 383-600 Roll Shock optional (full soft).
- Ti brakes are highly recommended with 2-piston caliper on floater.
| Left Front | Right Front | Left Rear | Right Rear | |
|---|---|---|---|---|
| Torsion Bar Size (+ Turns) | .675 (+1/2) | .700 (+1/2) | .725 (+1/2) | .712 (+1-1/2) |
| Coil Size (+ Turns) | 115 (+2) | 125 (+1) | ||
| Block Size | 1-1/2" | 1-1/2" | 1-1/2" | 1-1/2" |
| FK Shock Coil Over | 389-321, 389-2002 | 389-320 | 389-327, 389-331 | 389-210 DAS |
| FK Shock 4-Bar | 389-318 | 389-319 | ||
| Rebound Adj. (Clicks) | Full Stiff -2 | Full Soft +2 | Full Stiff -3 or -4 | Full Stiff -5 |
| Compression Adj. (Clicks) | Full Stiff -4 | Full Stiff -5 | Full Stiff -6 | |
| Center Line of Tire Offset | 40-1/2" Front Axle | 1" to the Right | 5/8" from Chain Block | 16" to 16-1/2" |
| Tire Pressure | 9 psi | 9 psi | 5 – 8 psi | 5-1/2 – 10 psi |
| Tires | 57x6.0 | 57x6.0 | 62, 63 x10 | 69Wx10 |
| Wheels | 10x7 (5" outer) | 10x7 (4" outer) | 10x10 (6" outer) | 10x13 up to 10x17 |
| Stagger | 6-1/4" (range: 6" to 8-1/2") | |||
| Wheelbase | Long | |||
| Wing | 14 sq Top, 32" Nose | |||
| Front Panhard | 3-1/4" | |||
| Right Wishbone Frame Hole | Middle or Bottom | |||
- Use 10-3/4" top wing posts, Aero wing tree, 12" nose wing posts, 22° angle on top wing. Start with wing full forward.
- Use 13" Jacob’s Ladder, 3 or 1 hole in paddle, 5-3/8" straps top, 5" straps bottom, frame tab hole furthest left top & bottom.
- Never use a bump rubber for outlaw winged.
- 383-600 Roll Shock recommended (full soft +1 turn).
| Left Front | Right Front | Left Rear | Right Rear | |
|---|---|---|---|---|
| Torsion Bar Size (+ Turns) | .700 (+1) | .700 (+1/2) | .725 (+1-1/2) | .712 (+1/2) |
| Coil Size (+ Turns) | 125 (+4) | 125 (+2) | ||
| Block Size | 1-1/2" | 1-1/2" | 1-1/2" | 1-1/2" |
| FK Shock Coil Over | 389-321, 389-2002 | 389-320 | 389-327, 389-331 | 389-210 DAS |
| FK Shock 4-Bar | 389-318 | 389-319 | ||
| Rebound Adj. (Clicks) | Full Stiff -2 | Full Soft +2 | Full Stiff -3 or -4 | Full Stiff -5 |
| Compression Adj. (Clicks) | Full Stiff -4 | Full Stiff -6 | Full Stiff -6 | |
| Center Line of Tire Offset | 40-1/2" Front Axle | 1" to the Right | 5/8" from Chain Block | 16" to 16-1/2" |
| Tire Pressure | 9 psi | 9 psi | 5 – 8 psi | 5-1/2 – 10 psi |
| Tires | 57x6.0 | 57x6.0 | 62, 63 x10 | 69Wx10 |
| Wheels | 10x7 (5" outer) | 10x7 (4" outer) | 10x10 (6" outer) | 10x13 up to 10x17 |
| Stagger | 6" (range: 5-1/2" to 8-1/2") | |||
| Wheelbase | Long | |||
| Wing | Rules mandated | |||
| Front Panhard | 3-1/4" | |||
| Right Wishbone Frame Hole | Middle or Bottom | |||
- Use 12" top wing posts, Aero wing tree, 12" nose wing posts, 25° on top wing. Start with wing 2" back.
- Use 13" Jacob’s Ladder, 3 or 1 hole in paddle, 5-3/8" straps top, 5" straps bottom, frame tab hole furthest left top & bottom.
- Never use a bump rubber for outlaw winged.
- 383-600 Roll Shock recommended (full soft +1 turn).
- Shock Valvings are extremely important — it should be the first place you upgrade your setup. Very few shock builders know what works on a Hyper chassis. Our chassis needs much different valving than others. Talk to Mike or Jim at Hyper Racing, or use our FK Shock Selector Configurator (389-000-K) on our website.
- Make sure the car is set up square using our squaring kit (80-6023). Watch the squaring video on our YouTube channel.
- Make sure you have enough counter steer. You need more for wingless: 50–55 degrees. Any less and you will spin. The left front tire needs to turn right until it comes within 1/8" of hitting the coil over spring.
- Use the 13" multipoint Jacob’s Ladder (04-6037) in hole 3 or 5. Hole 3 is better for corner entry. Use hole 1 for heavy tracks or a heavy driver.
- Get the 2021 Jacob’s Ladder frame tab update (96-103 or T-561(3), T-581(1), T-591(4)) and use the inner (left) most holes for all conditions with the 13" paddle. You must use the brake floater. This helps significantly on cushions and bumps.
- Generally, add as much left rear rebound as possible without the car getting a traction hop. This usually happens at the -1 to -4 click range on our preferred shocks. If your car hops and you didn’t purchase the shock from us, get one of our FK left rear shocks.
- Heavy drivers (over 190 lbs): The car will tend to be tight. Make sure the bottom seat bar is flush with the bottom rail so the driver is not raised at all. Use stiffer bars in the back, possibly softer springs in the front, and lower the car.
- Lightweight drivers (under 155 lbs): Raise the seat higher than the normal 3" (spacers up to 2-1/2" or seat bar adjuster). Lightweight drivers will have a loose car — keep the CGH up. Possibly use softer rear bars but keep ride heights up.
- The long 389-450 (or two blue FK bump stops stacked) are the best bump rubber option. Short bump rubbers are too inconsistent. Use the stiffer version for super slick tracks and the softer version for heavier or rougher tracks.
- Setting bump gap: Driver in the car, on a flat area, LR shock not tied down (or roll the car so LR rebound isn’t influencing position), no one leaning on the car. Use 3/4" or no bump stop when the track is heavy. Go to 0" gap for slick smooth track. Start with 1/4" to 1/2" for a normal track.
- Experiment with wider RR wheel widths for cushion stability. We run as wide as 17" using a 9" outer and 8" inner.
- Use a 3" Shackle Rod on the left, and a 2-1/2" on the right.
To Make the Car Looser
- For wet/heavy: lower the whole car as much as -1-1/2 turns in the back and -4 turns in the front (-1 on torsion). Mostly affects exit.
- Add rebound to the front shocks — helps keep CGH low. Mostly affects exit.
- Remove rebound from the RR shock; add compression to the RR shock.
- Add stagger. 7" wingless & 8" winged are common. Up to 9" can be used. Mostly affects entry.
- Move RR wheel out — up to 17-1/2" or as far as it will go. Make sure you have our long rear axles (56" for 1-3/4", 57" for 2").
- Add more rear tire pressure: 8–12 psi RR, 6–8 psi LR.
To Make the Car Tighter
- For slick: add cross weight (LR & RF turns) and raise the car. Typically +3 RF, +2 LF, +1-1/2 LR, +1/2 RR.
- Use less rear tire pressure: 4-1/2 psi LR, 5-1/2 psi RR.
- Add RR rebound. For smooth slick tracks with no cushion, use the 389-210-NC RR shock. Do not use the -NC shock on any kind of cushion.
- If too much cross causes loose entry: raise rear roll center, add RR shock compression, use Jacob’s Ladder hole 3, don’t go too soft on the RR bar. Min RR offset is 15-3/4".
- Raising rear roll center tightens entry; lowering it tightens middle and exit.
- Go to stiffer front coils (up to 150 LF/RF on smooth tracks). Stiffer LF tightens entry; stiffer RF tightens middle-out.
- Try a softer RR bar or stiffer LR bar. Recheck ride heights before and after bar changes.
- Track conditions affect wingless cars much more. Typical changes through the night for winged: move top wing back (up to 5"), add LF compression, maybe take 1/2" to 1" of stagger out.
- We highly recommend the RR roll shock for winged. Keep the regular shock (bump shock) full soft on compression. Add 2–4 turns of compression to the roll shock to help on the cushion.
- To tighten winged: Move top wing back (tightens exit), add LF compression, add LF/RR weight (tightens entry). Also reduce stagger — but less than 6" is not typically recommended.
- Resist the temptation to take rebound out of the left front for winged racing — the car becomes erratic and hard to drive.
- On larger tracks, more RR weight is needed for corner entry due to massive wing force rolling the car left. Start with the Normal Condition setup but add one more turn (+4 for coil) on the LF and RR.
- LF compression matters a lot on larger tracks for corner entry. Use more compression with linear or progressive valving on the LF to keep weight on the RR during the winged-down phase.
- Use a 32" wide nose wing (view) where legal. Set nose wing at 25–28 degrees.
- Top wing: 22–25 degrees on a 1/4 mile or smaller. On bigger tracks, go as low as 18 degrees for less drag and more straight-away speed.
- Pay attention: If the car is bottoming out on entry, add LR compression just enough to keep the LR off the track. Do not use a bump rubber on the LR for winged.
- If the car is not pointing in (slight push on entry), add more RF weight. Use a 40-1/2" front axle with a 4-on-3 RF offset wheel and a 5-on-2 LF offset wheel.
- Use X7 style rear bearing carrier plates. Start with 2-1/2" RR and 3" LR shackle rods with rod ends threaded in all the way. Use the 40-400 Torsion Arm Standoff on the RR for proper shock travel. If using the FK big body twin tube on the LR, a standoff is not needed there.
- Use the suggested block heights with shackles in the middle hole of the X7 bearing carrier plates. You can move the shackle pin to the top hole for slick tracks or the bottom hole for wet tracks to keep the arm angle constant.
- When comparing arm angles, block height, turns, tire pressure, offsets, fuel load, spring rates, and driver weight all play a role. Arm angle on a wishbone car is not as important as on a Z-link car.
These notes apply only for the short wheelbase (axle forward) configuration.
- Axle forward almost always has too much rear weight bias. We only recommend short wheelbase for extremely lightweight drivers, and even then the long wheelbase is usually better.
- If adding weight: place it at shoulder height, closer to the left side, right above the rear axle. We have special weights — call the shop. Do not mount weight low unless you want to loosen the car.
- The rear torsion arms have two shock mounts (forward and normal) — mount the shocks in the front hole for more control over the added rear weight. The 40-400 standoff can be spun around for different shock positions.
- Wingless: Jack the front of the car up with front shocks fully extended. Slide the clamps so the axle just touches the frame when shocks are fully extended. Lock the slider clamp there.
- Winged: Same method, but set the LF shock so the axle is 1" away from touching the frame. This allows the LF frame corner to travel down further as the chassis wings left. On small slick tracks, if you need more drive off, set the LF in the wingless position or go to 1/2" away from frame.
A chassis hop in the turn is caused by too much right rear weight. The RR can end up with massive dynamic weight transfer, causing the tire (which acts like a spring with no shock to dampen it) to oscillate.
Other ideas to reduce the hop: Add LF shock rebound, reduce LR rebound, move RR tire out, lower the chassis (generally more on the left side), lower the rear roll center, reduce RR compression, and move the right side wishbone to the lower hole.
- Adding rebound on any corner takes weight off that corner when the shock is extending. Adding compression adds weight when the shock shaft is moving in.
- The suggested block heights are for blocks resting on the smallest diameter part of the axle. With a 2" rear axle, use 1-1/2" blocks. If blocks rest on the smaller diameter spacer part, subtract 1/8"; on the larger diameter spacer part, subtract 1/4".
- With coil overs, add 4 turns to make the same change as adding 1 turn on a torsion bar.
- Make sure the car is set up according to the squaring kit instructions with axles square, offset correct, and chain aligned.
- Tire preparation — grinding, grooving, and siping — is essential for traction. Watch the tire prep video on Hyper Racing’s YouTube channel.
- Treat monotube shock pressures like extra turns in that corner. A 30 psi change is similar to adding a turn. Shock pressure does not change spring rate — it adds weight. If you have our FK shocks, race them as shipped until they need rebuilt (25 races or damaged).
- Our multipoint Jacob’s Ladder adjusts the roll center right and left by 4". Use hole #1 or #3 for winged and hole #3 or #5 for wingless. Hole #1 can be used on wet heavy tracks to loosen the car. Hole #5 moves the roll center furthest left — tightens middle and exit but can loosen entry.
- The 3-point ladder end tab and Jacob’s Jacker move the roll center up and down by 2". Moving the rod end down (or end tab to the top hole) lowers the roll center and tightens in the middle. Be careful — too low and the car will get loose on entry.
Starting with the X6 model, a second, higher right side wishbone mount was added (requires a different wishbone for each mount). The higher mount yields more drive (more anti-squat) and steers the car more to the left as it rolls right. This is most helpful when hitting a cushion or bump. The trade-off: weight transfers through the mechanical linkages instead of the springs and shocks, which can cause a harsher ride and increase hop tendency.
One of the hardest parts of getting your car faster is figuring out exactly what you want it to do. Focus on getting the car right on point-in and entry first — if it isn’t right in these stages, the rest of the turn will never be good.
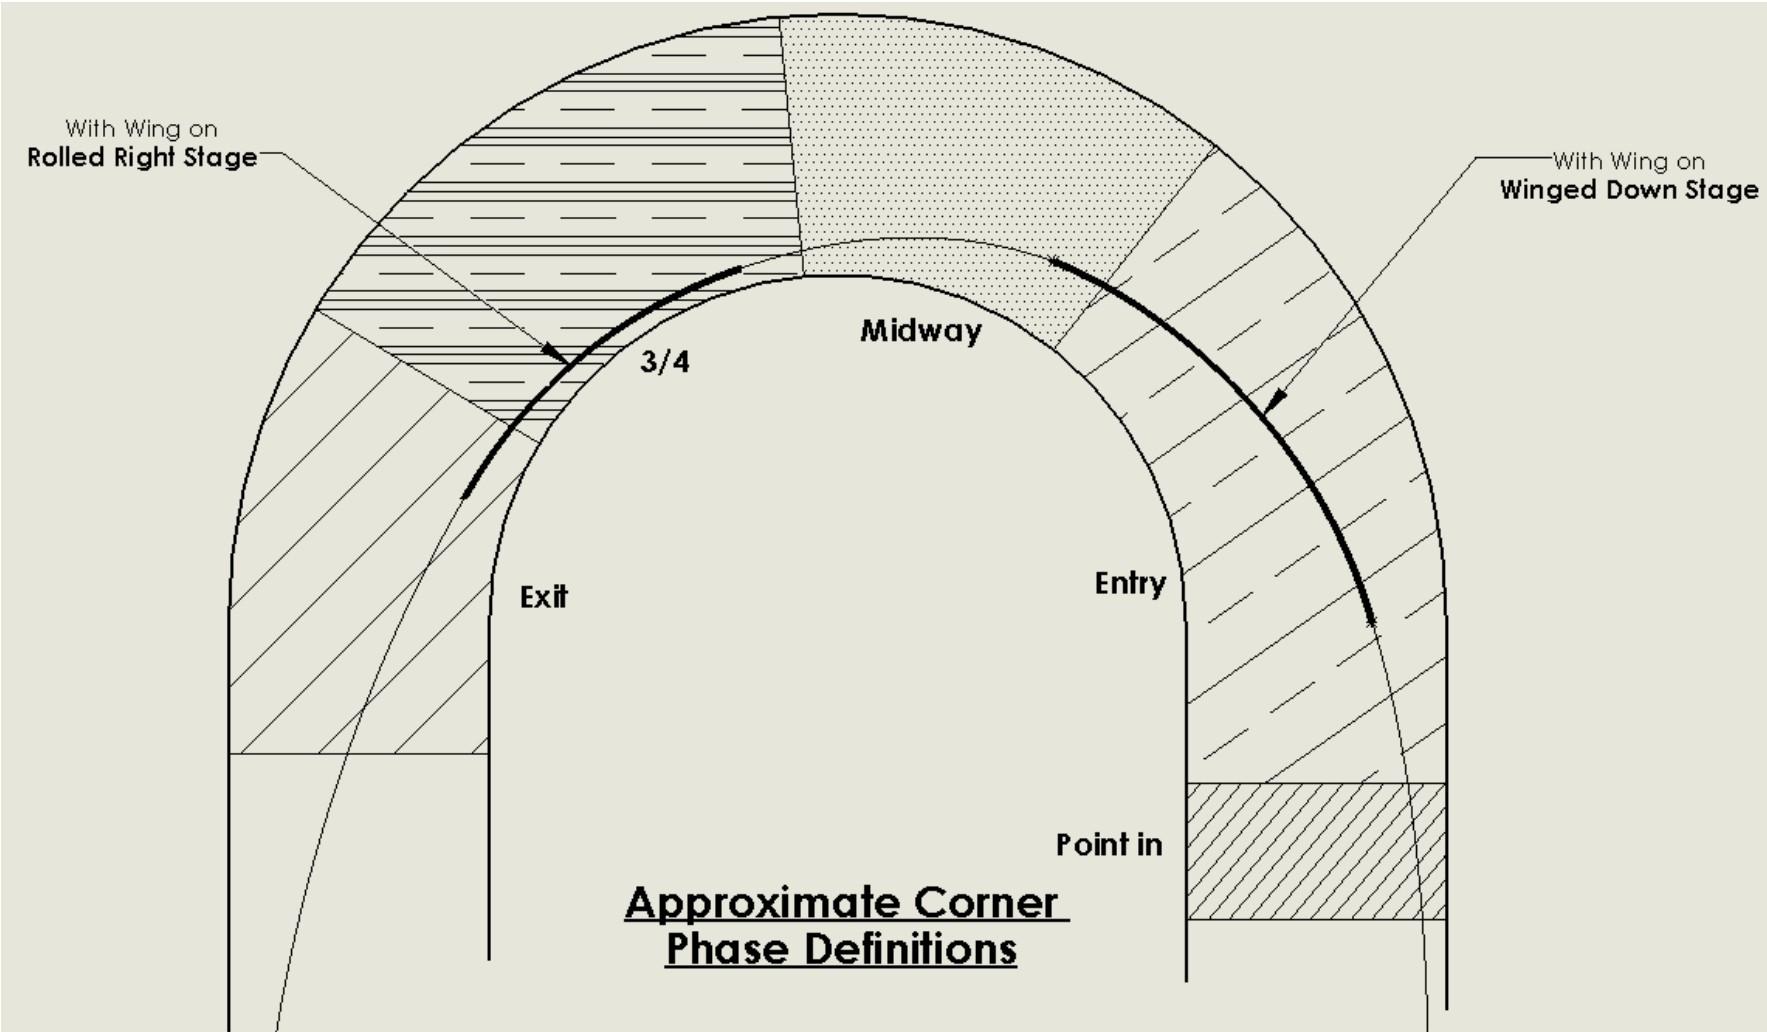
This is when the car rolls left due to the wing sideboards on corner entry. The bigger the track and wing, the longer this stage lasts. Adjust the left side springs and shocks to control the car during this phase.
This occurs when the car slows enough that lateral g-force exceeds the wing’s side force. Pay attention to how the car behaves in both winged-down and rolled-right phases. The winged-down stage varies by track size/shape and changes as the track goes slick.
A very short phase where the driver first turns left. A push here is usually from not enough RF weight. Add RF turns, take out LF turns, check RF offset, or use a stiffer RF spring. A car will never be loose in this phase.
Wingless: The car transitions from rolling left to right. Too much static LR weight causes loose entry until weight transfers to the RR. Right side springs, RR shock compression, left side rebound, and RR wheel offsets all matter.
Winged: The very violent winged-down-left action happens here. Watch for the LR bottoming out. You may need more LR high-speed compression, stiffer LR spring, or higher LR ride height. LF compression, LF spring rate, and offsets are all big players.
The driver is getting back on the throttle or at full throttle. Lateral g-force is greatest here. Ride heights, corner weights, and front rebound all play a role. Shock dampening in both rebound and compression still matters as the shocks never stop moving.
Near the end of 3/4 phase, the car begins to roll left and back to neutral as lateral g-forces decrease. Left side compression, right side rebound, and the LR bump rubber (wingless) have effect here. CGH (ride heights) and rear weight bias are everything on corner exit. More rear weight and a higher car yield more forward bite. With the wing on, wing angle plays its biggest part in this phase.
Ready to Upgrade Your Setup?
Browse our full line of 600cc Micro Sprint chassis, components, and recommended parts.